Getting a modular kitchen is exciting. You have probably spent weeks scrolling through Instagram reels and Pinterest boards, saving images of sleek countertops and clever corner units. The vision is clear. But the process? That part is usually a blur.
Most homeowners walk into their first design consultation without knowing what happens next. How long will it take? What decisions will you need to make? What should you prepare? When does manufacturing start? What does installation day actually look like?
This guide answers all of those questions. It walks you through every stage of a typical modular kitchen design service so you know exactly what to expect. Whether you are working on a new home interior design project or renovating an existing kitchen, the process follows the same steps.
Stage 1: The Initial Consultation
This is where everything begins. You reach out to a modular kitchen company. They schedule a consultation. It usually happens at their showroom, at your home, or through a video call.
During this meeting, the designer asks questions about your kitchen. How many people cook at the same time? Do you prefer gas or induction? How much storage do you need? Do you entertain often? Do you want an open kitchen or an enclosed one?
They also ask about your budget. This is not the time to be vague. A clear budget range helps the designer recommend the right materials, finishes, and hardware without wasting time on options you cannot afford. If your budget is three lakhs, say so. If it is eight lakhs, say that.
The consultation should last 30 to 60 minutes. By the end of it, the designer should have a clear picture of your needs, preferences, and constraints. If they rush through this step or skip questions about your cooking habits, that is a sign they are following a template instead of designing for you.
Stage 2: Site Measurement
After the initial discussion, the design team visits your kitchen for a site survey. This is one of the most critical steps in the entire process. Every dimension matters.
The team measures the room width, depth, and height. They note the position of windows, doors, electrical points, plumbing lines, and gas connections. They check the floor level for unevenness. They record the location of the drain and the exhaust opening.
These measurements feed directly into the design software. If they are off by even half an inch, the cabinets will not fit properly during installation. Gaps appear. Drawers hit the window frame. The countertop does not sit flush.
A serious modular kitchen design company sends a trained surveyor for this step. Not a junior assistant with a tape measure. The person measuring should understand construction tolerances, plumbing setbacks, and electrical clearances. Precision at this stage prevents expensive corrections later.
Stage 3: Layout Planning and the Work Triangle
Once the measurements are in, the designer creates a layout. This is where the floor plan of your kitchen takes shape.
The layout is built around the work triangle. This is the imaginary line connecting your stove, sink, and refrigerator. The distance between these three points should be between four and nine feet. Too close, and you feel cramped. Too far, and you waste steps during every meal.
Depending on the shape of your room, the designer will recommend an L-shaped, U-shaped, parallel, straight, or island layout. Each has its strengths.
L-shaped layouts suit most Indian apartments. They work well in kitchens between 60 and 100 square feet. U-shaped layouts offer more storage and counter space but need at least 80 square feet. Parallel kitchens fit narrow, elongated rooms. Island layouts need a minimum of 150 square feet.
The designer should present two or three kitchen layout options. Do not settle for the first draft without understanding the alternatives. Ask why one layout was recommended over another. A good designer will explain the reasoning in terms of workflow, storage capacity, and movement patterns.
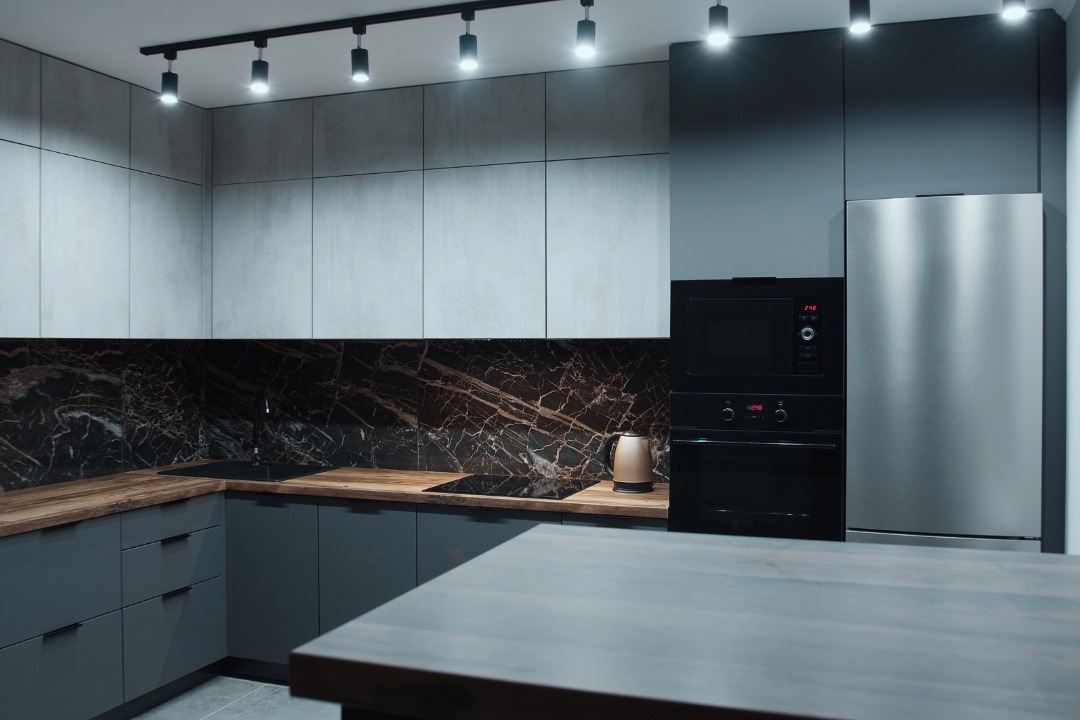
Stage 4: 3D Visualisation and Material Selection
This is the most visual stage of the process. The designer creates a 3D render of your kitchen. It shows exactly how the finished space will look from multiple angles.
The render includes cabinet placement, countertop colour, shutter finish, backsplash material, handle style, and appliance positions. You can see how the colours work together. You can spot issues like a cabinet that blocks the window or a countertop that looks too dark for the room.
At this point, you also select materials. The three main decisions are the carcass material, the shutter finish, and the countertop surface.
For the carcass, BWR-grade plywood is the most reliable option for Indian kitchens. It resists moisture, holds screws firmly, and lasts ten years or more. MDF works for shutter panels but should not be used for the carcass in areas exposed to steam and water.
For shutters, options include laminate, acrylic, PU-coated, membrane, and veneer finishes. Laminates are the most practical for daily Indian cooking. Acrylic and PU finishes suit modern aesthetics.
For the countertop, granite, quartz, and solid surface are the most common choices. Granite is affordable and heat-resistant. Quartz offers a wider colour range and is non-porous.
Take your time with this stage. Ask for physical samples, not just screen colours. Colours look different under showroom lights and natural daylight.
Stage 5: Quotation and Approval
Once the design and materials are finalised, the company prepares a detailed quotation. This document should itemise every component.
The quote should list the carcass material and grade. The shutter material and finish. The countertop material. The hardware brand and products. Accessories like cutlery trays and corner carousels. Installation charges. And any exclusions.
Compare this quote with your original budget. If it exceeds your number, ask the designer where costs can be adjusted. Maybe you switch from quartz to granite for the countertop. Maybe you reduce the number of pull-out accessories. A skilled kitchen interior designer will help you make trade-offs without sacrificing the parts that matter most.
Do not approve a quote that says “as per design” without line items. That leaves too much room for surprise charges later.
Stage 6: Manufacturing
This is where the kitchen moves from screen to reality. And this is where the quality of the manufacturer matters most.
In a factory-built modular kitchen, panels are cut on CNC machines to precise dimensions. Edge banding is applied using automated machines that seal every surface against moisture. Shutters are finished in dust-free booths. Modules are pre-assembled and checked for fit before packing.
This precision is only possible in a factory. A carpenter on site cannot match the accuracy of a CNC router or the finish quality of an industrial spray booth.
The manufacturing stage typically takes two to three weeks for a standard-sized kitchen. Companies with in-house manufacturing facilities control this timeline because they are not waiting on third-party vendors. A company that outsources production to multiple fabricators often faces delays that push the project weeks beyond the original schedule.
Holzbox, for instance, designs and manufactures modular kitchens in its own factory. That means the design team and the production team work under the same roof. Dimensions are verified at every stage. Hardware is tested on the actual panels. And every module is inspected before it ships.
Stage 7: Delivery and Installation
The modules arrive at your home packed in protective wrapping. A trained installation team unpacks, positions, and assembles every unit on site.
Modular kitchen installation for a standard setup takes two to three days. The team levels the base units, mounts the wall cabinets, fits the countertop, installs the backsplash, and connects the sink plumbing. Every custom modular kitchen is assembled to match the exact dimensions recorded during the site survey.
Good installation teams work clean. They protect your flooring with sheets. They dispose of all packaging material. They leave the kitchen ready to use, not half-finished with loose wires and sawdust.
After installation, expect a final walkthrough. The project manager opens every cabinet, pulls every drawer, and checks every joint in front of you. Any alignment issues or cosmetic defects should be flagged and corrected before sign-off.
Stage 8: After-Sales Support
A good modular kitchen design service does not end on installation day. Hinges may need fine-tuning after a few weeks. A drawer runner might need re-alignment after the initial settling period. The countertop sealant may need a touch-up after the first deep clean.
Ask your provider about their warranty terms before you start. What is covered? For how long? What is the typical response time for a service call? Is there a dedicated helpline?
Manufacturers with their own factory tend to offer more reliable after-sales support because they stock replacement parts and can dispatch service teams without depending on external suppliers.
What You Should Prepare Before the First Meeting
Walk into your first consultation prepared. It will save time and lead to a better outcome.
Measure your kitchen roughly. You do not need exact numbers. Just the approximate width, depth, and ceiling height. Take photos of the current kitchen from all four corners. Note where the gas line enters. Note where the drain pipe sits. Note the position of existing electrical points.
Make a list of appliances you plan to keep or add. A built-in oven, a dishwasher, a water purifier, and a microwave all need specific cabinet dimensions and electrical points. If the designer does not know about these appliances upfront, the layout will not account for them.
Know your budget range. And know your timeline. If you need the kitchen ready before Diwali, say so in the first meeting. Deadlines shape material choices, production scheduling, and installation sequencing.
Frequently Asked Questions
How long does the entire modular kitchen process take from start to finish?
A typical modular kitchen project in India takes four to six weeks from the first consultation to completed installation. This includes one to two days for consultation and site measurement, one week for design and material selection, two to three weeks for manufacturing, and two to three days for on-site installation. Timelines can stretch if there are delays in design approval, material availability, or civil work that needs to happen before installation begins.
What is the average cost of a modular kitchen in India?
Costs depend on the kitchen size, layout, materials, and hardware. A basic L-shaped kitchen with laminate shutters and standard hardware starts at around two to three lakh rupees. A mid-range setup with BWR plywood carcass, acrylic shutters, quartz countertop, and branded soft-close hardware typically falls between four and six lakhs. Premium kitchens with PU finishes, imported hardware, and integrated appliances can exceed eight lakhs. Always ask for an itemised quotation to understand exactly what is included.
Can I make changes to the design after approving it?
Minor changes are usually possible during the early manufacturing stage. Adjustments like changing a shutter colour or swapping a handle style can often be accommodated. However, structural changes like altering the layout, adding or removing modules, or changing the countertop material after production has started will increase costs and delay delivery. Finalise your design thoroughly before giving approval to avoid mid-project changes.
Do I need to get civil work done before the modular kitchen is installed?
Yes. All civil work should be completed before installation day. This includes wall plastering, floor tiling, electrical wiring, plumbing rough-in, and painting. The kitchen modules are designed to fit the finished dimensions of the room. If the walls are unplastered or the flooring is incomplete, the measurements will be off and the modules will not fit correctly. Coordinate with your contractor to ensure all civil work is done at least a week before the scheduled installation date.
What is the difference between a factory-made modular kitchen and a carpenter-made kitchen?
A factory-made modular kitchen is built in a controlled environment using CNC machines, automated edge banding, and standardised quality checks. Every module is pre-assembled, tested, and packed before delivery. A carpenter-made kitchen is built on site using hand tools and manual measurement. Factory-built kitchens offer tighter tolerances, better finish quality, sealed moisture-resistant edges, and faster installation. Carpenter-made kitchens are more affordable but lack the precision, consistency, and long-term durability of factory production.